Recently I have been tasked with standing up a graylog cluster for our new development team. Even though I have stood up a highly scalable graylog on a regular IaaS/Virtual machine, utilizing Azure AKS was not something that I have done in the past. I was always skeptical about how would Azure handle the data volume, so this weekend I was ready to spend some time trying to play with Azure AKS (and ended up spending the entire weekend)
TL;DR
No time to read the entire post? Here is the github contains all the scripts
https://github.com/getvivekv/graylog-ha-azure-aks
Requirements
- Graylog on a private network
- A FQDN assigned with a valid / custom SSL certificate
- Use our existing Subnet on a virtual network
- Ability to grow elastic search data volume without data loss.
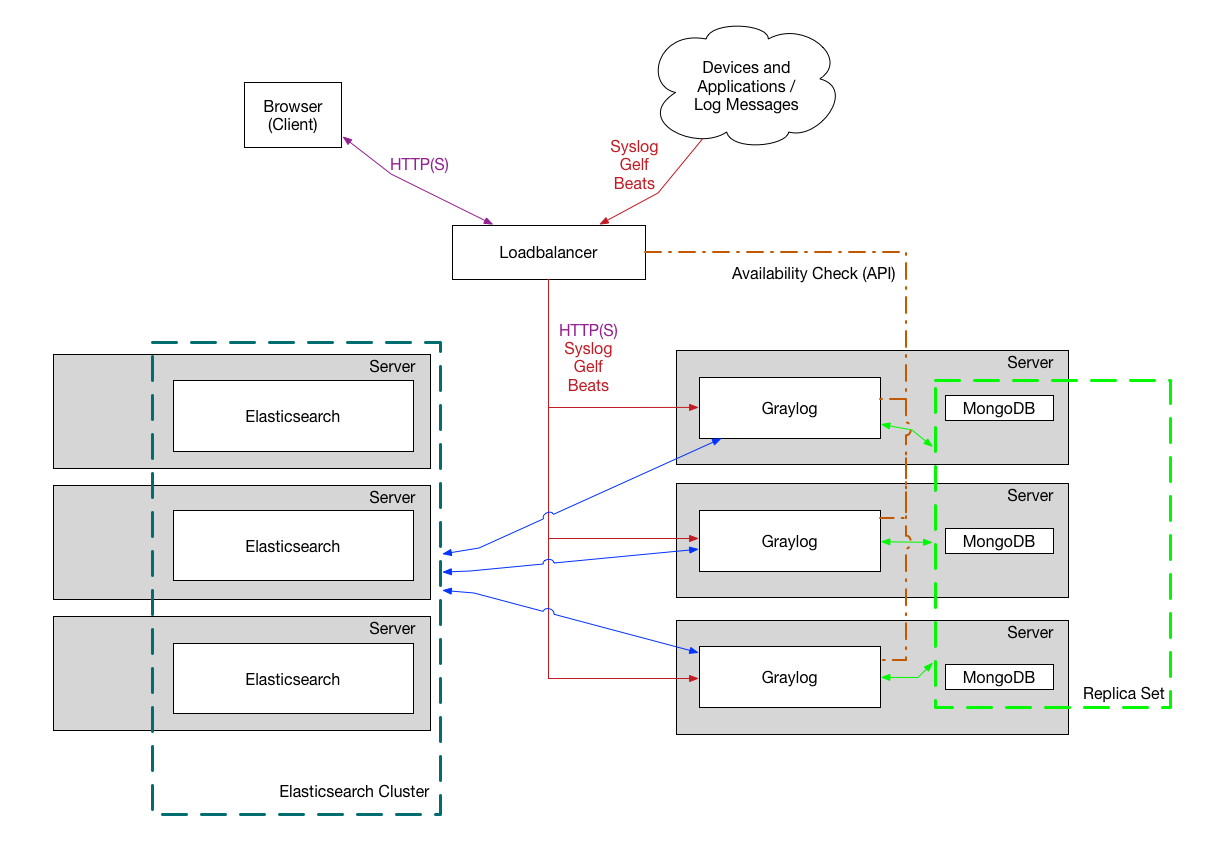
- Highly available structure for graylog, elasticsearch and MongoDB so that the underlying infrastructure issue won’t cause downtime to the program.
Plan
The plan is to setup the graylog, elastic search and mongodb as follows
- MongoDB replicaset: 3 pods
- Elastic search master : 3 pods
- Elastic search client : 3 pods
- Elastic search data : 3 pods with 500GB expandable volume
- Graylog : 2 pods with the ability to scale up
- Azure Private Load Balancer
- Point a domain to the private load balancer
- Enable UDP port for Graylog Input and accept graylog traffic on Private IP
Preparation
Due to a bug in the Azure-Cli I was not able to create the Azure Kubernetes cluster using cli on an existing subnet. Hence I had to create the kubernetes cluster manually through the Azure Portal. Creating the cluster through Azure portal wasn’t that hard. You can create a cluster with public or private endpoint. One thing that I don’t like in AKS is that it uses Azure’s CNI which reserves A LOT of IP address to assign each IP per pod. So be sure to select a subnet that has plenty of IP address. I ended up assigned an entire /24 block for this kubernetes cluster.
The following article assumes that the cluster is public hence we will setup a private load balancer in our own subnet in order to deploy our internal applications.
Assuming that the Kubernetes name is devops-tools and the resource group name is devops-tools-rg
# Set the correct subscription. Skip this step if this is already set in your cli
az account set --subscription "your-subscription"

# Get the kubernetes creds and configure .kube/config. This assumes that you have already logged into your Azure environment with az login

az aks get-credentials --resource-group devops-tools-rg --name devops-tools
Nginx Ingress Controller
I was so excited reading about the Traefik ingress controller. However, after spending two days and nights I found that its new version had a bug due to which it is not generating HTTPS route automatically. So I ended up using Nginx Ingress Controller which now works just great.
Why ingress controller?
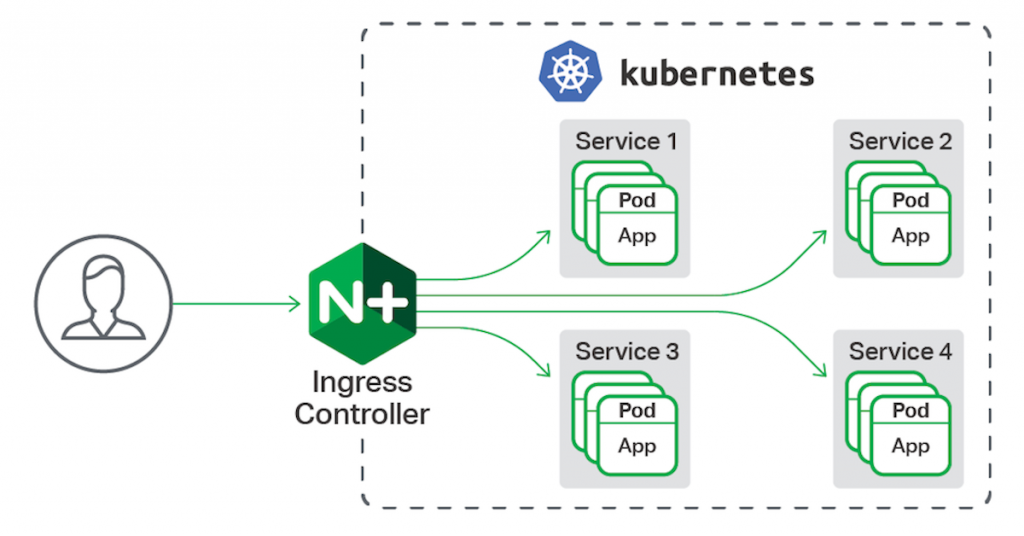
Kubernetes Ingress Controller provides us a way to assign a single entry point for all of our application. The ingress controller handles the HTTP routing and SSL termination so that we don’t have to worry about spending time configuring an Azure Application Gateway / Load balancer.
Install Nginx Ingress Controller
Installing nginx controller using helm is easy. Assuming that you have Helm installed and configured to fetch stable release
Create a file called internal-ingress.yaml and copy/paste the below contents. Be sure to change the loadBalancerIP to a free IP address in your subnet.
controller:
  nodeSelector:
    beta.kubernetes.io/os: "linux"
  replicaCount: 2
  service:
    loadBalancerIP: 172.23.8.100
    annotations:
      service.beta.kubernetes.io/azure-load-balancer-internal: "true"
  autoscaling:
    enabled: true
    minReplicas: 2
    maxReplicas: 10
    targetCPUUtilizationPercentage: 80
    targetMemoryUtilizationPercentage: 80
  defaultBackend:
    nodeSelector:
      beta.kubernetes.io/os: "linux"
helm repo add nginx-stable https://helm.nginx.com/stable
helm repo update
helm install nginx-internal stable/nginx-ingress \
--create-namespace \
--namespace ingress-internal \
-f internal-ingress.yaml \
--set controller.ingressClass=nginx-internalThe above Helm command is specific to version 3. If you are on older version, please refer this page
This would stand up a Private Load balancer on Azure with the private IP 172.23.8.100
Create a namespace and switch
I like to have a namespace for each application as the logical separation so that incase if I don’t want to keep the resources, I could simply delete the namespace instead of worrying about removing individual workload
kubectl create namespace $namespace
kubectl config set-context $(kubectl config current-context) --namespace=$namespace
MongoDB setup
This setup uses a MongoDB replicaset with no authentication. This means the containers in the cluster may able to access the mongodb (not from outside the cluster). In a perfect secure setup you would need to consider setting up db authentication. It uses MongoDB Helm Chart which supports adding user auth
https://github.com/helm/charts/tree/master/stable/mongodb-replicaset
helm install mongodb stable/mongodb-replicaset --namespace $namespace -f mongodb.yamlElastic search setup
This is the interesting part where I spent hours and hours to try to setup and test to make sure that the data volume can be expanded without dataloss.
As indicated above, this uses an unauthenticated connection. In a perfect setup you should setup authentication. Access from outside the cluster is not permitted with the current setup.
File elasticsearch-client.yaml
---
clusterName: "elasticsearch"
imageTag: 6.8.9
nodeGroup: "client"
roles:
  master: "false"
  ingest: "false"
  data: "false"
replicas: 2
esJavaOpts: "-Xmx2g -Xms2g"
resources:
  requests:
    cpu: "100m"
    memory: "2Gi"
  limits:
    cpu: "2000m"
    memory: "5Gi"
volumeClaimTemplate:
  resources:
    requests:
      storage: 1Gi
persistence:
  enabled: false
file: elasticsearch-data.yaml
---
clusterName: "elasticsearch"
imageTag: 6.8.9
nodeGroup: "data"
roles:
  master: "false"
  ingest: "true"
  data: "true"
replicas: 3

esJavaOpts: "-Xmx1g -Xms1g"
resources:
  requests:
    cpu: "50m"
    memory: "1Gi"
volumeClaimTemplate:
  resources:
    requests:
      storage: "500Gi"
file: elasticsearch-master.yaml
---
clusterName: "elasticsearch"
imageTag: 6.8.9
nodeGroup: "master"
roles:
  master: "true"
  ingest: "false"
  data: "false"
replicas: 3
esJavaOpts: "-Xmx3g -Xms3g"
resources:
  requests:
    cpu: "500m"
    memory: "3Gi"
  limits:
    cpu: "2000m"
    memory: "8Gi"
volumeClaimTemplate:
  resources:
    requests:
      storage: 4Gi
# Install Elasticsearch
helm upgrade --install --namespace $namespace --values ./elasticsearch-master.yaml elasticsearch-master elastic/elasticsearch
helm upgrade --install --namespace $namespace --values ./elasticsearch-client.yaml elasticsearch-client elastic/elasticsearch
helm upgrade --install --namespace $namespace --values ./elasticsearch-data.yaml elasticsearch-data elastic/elasticsearch
SSL Certificate
This assumes that you already have your own SSL certificate. If you do not have one, you can purchase a new SSL cert or get one free of cost from LetsEncrypt using DNS challenge. For LetsEncrypt, this doesn’t cover auto reviewal and all. For our company, we don’t use letsencrypt and have our own paid ssl certificate.
# Import SSL certificate to Kubernetes and create as a secret
kubectl create secret tls mydomain-ssl --key mydomain.key --cert mydomain.cert --namespace $namespace
Now, finally create a file called “graylog.yaml” with the following content
graylog:
  metadataLabels:
  image:
    repository: "graylog/graylog:3.3"
    pullPolicy: "IfNotPresent"
  replicas: 2
  persistence:
    enabled: true
    accessMode: ReadWriteOnce
    size: "10Gi"
  input:
    udp:
      service:
        type: NodePort
      ports:
        - name: getlf-30010-udp
          port: 30010
          nodePort: 30010
  service:
    annotations:
    type: ClusterIP
    port: 9000
  ingress:
    annotations:
      kubernetes.io/ingress.class: nginx-internal
    enabled: true
    hosts:
      - graylog.mydomain.com
    tls:
      - secretName: mydomain-ssl
        hosts:
          - graylog.mydomain.com
  resources:
    limits:
      cpu: "1"
    requests:
      cpu: "100m"
      memory: "1Gi"
  geoip:
    enabled: true

  ## Set Graylog Java heapsize. If this value empty, chart will allocate heapsize using `-XX:+UseCGroupMemoryLimitForHeap`
  ## ref: https://blogs.oracle.com/java-platform-group/java-se-support-for-docker-cpu-and-memory-limits
  ##
  # heapSize: "1024g"

  ## Additional graylog config which is defined on `graylog.conf`.
  ## You can find a complete list of graylog config from http://docs.graylog.org/en/3.0/pages/configuration/server.conf.html
  ## Graylog config is written in Java properites format. Make sure you write it correctly.
  ##
  # config: |
  #   elasticsearch_connect_timeout = 10s
  #   elasticsearch_socket_timeout = 60s
  #   elasticsearch_idle_timeout = -1s

  journal:
    deleteBeforeStart: true

  ## Additional server files will be deployed to /etc/graylog/server
  ## For example, you can put server certificates or authorized clients certificates here
  ##
  serverFiles:
     server.key: |
     server.cert: |
Deploy graylog
helm upgrade --install --namespace $namespace  graylog stable/graylog \
  --set tags.install-mongodb=false\
  --set tags.install-elasticsearch=false\
  --set graylog.mongodb.uri=mongodb://mongodb-mongodb-replicaset-0.mongodb-mongodb-replicaset.$namespace.svc.cluster.local:27017/graylog?replicaSet=rs0 \
  --set graylog.elasticsearch.hosts=http://elasticsearch-client.$namespace.svc.cluster.local:9200 \
  -f graylog.yaml
A couple of points here,
- Make sure you change the graylog.yaml file with your own domain name, SSL secret key etc.
- Every setup may vary Java memory usage, and container CPU/LIMIT. I would suggest that you start with some lower threashold and if you start seeing OOMkill or higher load due to large amount of data processing, you may want to consider upgrading the JAVA JVM memory limit and container CPU/RAM.
Wait for a few minutes for the containers to come up
kubectl get pods -wSetup DNS
While the containers are being created, setup a DNS zone “A” record for your domain pointing to the private load balancer IP that you specified above.
As soon as the containers are up, Nginx Ingress controller will pick up the change and reconfigure the virtual host automatically and you will have a working graylog setup
Graylog Input
graylog.yaml contains the configuration for adding/editing graylog Inputs. In my setup, I have only created 1 Input (UDP port 30010)
  input:
    udp:
      service:
        type: NodePort
      ports:
        - name: getlf-30010-udp
          port: 30010
          nodePort: 30010
You can add additional graylog inputs. For TCP, change the input type to “tcp”. For a list of additional configuration please check https://github.com/helm/charts/tree/master/stable/graylog
Point LB to graylog input port
The graylog inputs are created as a kubernetes service in your cluster with the ports exposed as NodePort. So you will have to configure the load balancer to forward the traffic to the correct port. Hence we create a rule for it
# Make sure to point to the correct resource group and location
az network lb rule create -g mc_devops-tools--rg_devops-tools_eastus \
    --lb-name kubernetes-internal \
    --name udp30010 \
    --protocol Udp \
    --frontend-port 30010 \
    --backend-port 30010 \
    --backend-pool-name Kubernetes
And that’s it. Now you should have a working graylog instance.
Questions
- How do I upgrade Graylog version?
- Edit graylog.yaml and update the “repository” version. Eg, repository: “graylog/graylog:3.3” => repository: “graylog/graylog:3.4”
- Re-run the “helm upgrade –install $namespace graylog” command provided above.
- This will kill existing pods and start new pods with the latest release
- How do I upgrade elasticsearch Or MongoDB?
- The process is the same. Edit the yaml file and re-run. Note that Elasticsearch 7 is not yet supported by Graylog at the time of this writing, so if you are thinking about upgrading elasticsearch to 7 don’t do it now.
- How do I scale up elasticsearch data volume size?
- This would require a bit more explanation, read more below
Scaling up Volume for Elasticseach
In this case, we created 3 statefulsets. Statefulset comes with some limitations. One of them is that you cannot resize the underlying PV/PVC while the pods are running. So if you want to upgrade the volume for data pod of elasticsearch you will have to shutdown the statefulset (or scale replicas to 0) and then scale up the PVC
Warning – Shutting down elasticsearch data volume may cause downtime to graylog log writing (even though graylog would itself will be up). However, as I understand, you will not lose data as graylog would save the incoming logs in its queue for some time.
# Step 1 - Shutdown the elasticsearch data scaleset
kubectl scale sts elasticsearch-data --replicas=0

# Wait for the scale set to show 0 pods
kubectl get sts

# Now, scale up the Physical Volume Claim
kubectl get pvc

kubectl edit pvc elasticsearch-data-elasticsearch-data-0

# look for resources.requests.storage and update it with the new storage limit. Note that you cannot scale down, only scale up. Update and save

# Repeat the same for the other data pvcs
kubectl edit pvc elasticsearch-data-elasticsearch-data-1
kubectl edit pvc elasticsearch-data-elasticsearch-data-2

#Use the following command to view the log of the resizing
kubectl describe pvc elasticsearch-data-elasticsearch-data-0

#It should say waiting for the pod to boot up to resize.
# Open Azure Portal and goto the k8s resource group. Verify that the physical volumes are resized.

#Now scale the sts back

kubectl scale sts elasticsearch-data --replicas=3
Github
All the scripts that I’ve used can be found at https://github.com/getvivekv/graylog-ha-azure-aks